In-person payment terminals make it easy for customers to insert or tap their card and complete checkout right on site. Our terminals seamlessly integrate with Kimoby and create a classic checkout experience when customers prefer paying in-person with their card over using a payment link. This article explains the benefits of our payment terminals and shows how to set up terminal payments in Kimoby.
Quick Links
- Why Our Solution is Better
- How to Set Up Your Kimoby Pay Terminals
- Taking a Payment
- Refunding a Customer
- Setting Up a Printer for Paper Receipts
- Relevant Links
Why Kimoby Pay In-Person Payments
Kimoby’s In-Person Payment terminals deliver a superior payment experience designed specifically for dealerships.
- Unlike generic payment solutions, Kimoby connects directly to your Repair Orders to auto-populate amounts—no manual entry, no mistakes.
- Customers can instantly split larger bills into manageable monthly payments through Affirm, right at checkout.
- Premium features like remote refunds, a modern checkout flow, and flexible receipts create a faster, smoother, more professional experience.
- Wireless terminals with a 15-hour battery life let staff take payments anywhere in the dealership without interruptions.
How to Set Up Your Kimoby Pay Terminals
You can follow the interactive walkthrough below for a step-by-step guide to setting up your payment terminal in Kimoby:
Or you can follow these steps:
Tip
This process can be done simultaneously for multiple terminals at once.
- Power up the device using the power button at the top-right of the device.
- Plug the device directly into a wall with the charger it came with.
- Connect the device to a secured Wi-Fi network.
- Register the device:
- Log into the Kimoby web app.
- Click Kimoby Pay.
- Click Terminals.
- Click Register a Terminal.
- Enter the registration code (three hyphenated words) shown on the device.
- Click Register.
- The device will automatically begin to install updates. (Approx. 15-20 minutes)
- Activate the device:
- Log into the Kimoby web app.
- Click Kimoby Pay.
- Click Terminals.
- Click Activate a Terminal. A QR code will appear.
- Power up the device.
- Using the device’s built-in camera, scan the QR code on the Kimoby web app. The device will be activated.
Taking a Payment
Quick Payment
You can follow the interactive walkthrough below for a step-by-step guide to taking a quick payment:
Or you can follow these steps:
- On the terminal, select Quick Payment.
- Select No Reference.
- Enter the amount of the bill.
From here, there are two ways for the customer to pay. Entering the card number manually, or having the customer pay themselves.
If the customer is not present in the store and authorizes you to enter their card details:
- Check the box Enter card number manually.
- Select Continue.
- A warning will appear. Read it carefully and select Continue.
- Enter the credit card number, expiry date, CVV, and postal code, clicking Continue after entering each field.
- Once payment is complete, select how to send the receipt to the customer: SMS, Email, or Print.
- Select Send & Complete.
If the customer will pay themselves:
- Select Continue.
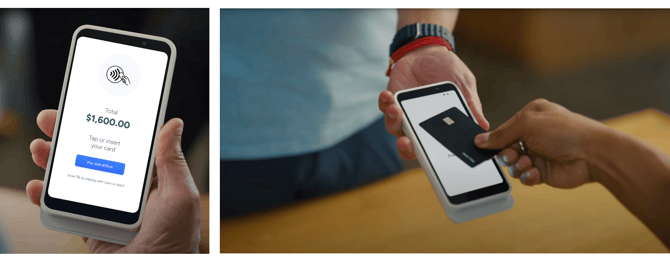
- Give the terminal to the customer. They will see the amount and the option to tap or insert their card.
- Once payment is complete, the customer can select how they want to receive their receipt: SMS, Email, or Print.
- The customer selects Send & Complete and returns the terminal to you.
Repair Order Payment
You can follow the interactive walkthrough below for a step-by-step guide to taking a payment with a repair order:
Or you can follow these steps:
- On the terminal, select Repair Order.
- Find the repair order in the list or use the search bar and type in the RO number.
- The invoice amount will populate automatically. Select Continue.
- Give the terminal to the customer. They will see the amount and the option to tap or insert their card.
- Once payment is complete, the customer can select how they want to receive their receipt: SMS, Email, or Print.
- The customer selects Send & Complete and returns the terminal to you.
Refunding a Customer
You can refund a customer that has paid using the in-person terminal, with a credit card or via Affirm, without having the customer physically present.
To refund a customer who paid in-person with a credit card or via Affirm:
- Open the customer's conversation or profile, or search for the transaction in the Kimoby Pay Transactions tab.
- Select the invoice that you want to refund.
- Click Refund.
- Click either Full Refund or Partial Refund with the amount that needs to be refunded. You can refund an invoice as many times as you'd like until the balance of the invoice is zero.
- Click Refund.
For more information on refunding a customer, click here.
Customers that have paid using the in-person terminal with a debit card cannot be remotely refunded. The customer must be physically present and have their original payment card on hand.
To refund a customer who paid in person using a debit card:
- Open the customer's conversation or profile, or search for the transaction in the Kimoby Pay Transactions tab.
- Select the invoice that you want to refund.
- Click Refund.
- Click either Full Refund or Partial Refund with the amount that needs to be refunded. You can refund an invoice as many times as you'd like until the balance of the invoice is zero.
- Under Payment terminal, select the terminal that the customer will use to enter their card.
- Give the terminal to the customer. They will insert their card and enter their PIN to finalize the refund.
For more information on refunding a customer, click here.
Setting Up a Printer for Paper Receipts
In addition to text and email receipts, you can also set up a printer in case a customer prefers having a paper receipt.
You can follow the interactive walkthrough below for a step-by-step guide to setting up a printer:
Or you can follow these steps:
- Select Settings (gear icon) at the top-right corner of the terminal.
- Select Printing.
- Select Discover Printers. A list of printers on your network will appear. Select the one you want to pair with your device.
- If your printer is not listed, select Add printer manually and enter the printer’s IP address.