The Conversations interface is simple to use and facilitates teamwork through more efficient collaboration. Team members can communicate effectively with each other and clients. All conversations are automatically stored, made searchable, and readily accessible for staff. You can filter opened and closed conversations. It is also possible to find a specific conversation using the search bar to locate customers, events, payments, appointments, and more.
Quick Links
- Viewing a User's Conversation
- Replying in Another User's Conversation
- Assigning a Conversation
- Assigning Multiple Conversations
- Searching for a Customer's Data
- Filtering Conversations
- Closing Conversations Automatically
- View the Message Source
- Viewing Unread Messages by Assignee Icon
- Notifications for Unanswered Conversations
- Conversations in Appointments
- Conversations in Automations
- Conversations in Campaigns
- Writing a Message to a Customer who no Longer has a Cell Phone Number
- Creating Teams in Conversations
- Exporting a Conversation
- Archived Conversations for Merged Profiles
Viewing a User's Conversation
Since it's possible to see conversations from other users, it's easy to stay up-to-date with what's going on within the company.
To view other teams’ and users’ conversations:
- Click on the drop-down menu at the top of the page to display all current users and teams.
- Click on the name of the user or team you want to view, or click on All to view all open conversations.
- To return to viewing only your conversations, click on the drop-down menu again and select your name at the top of the list.
Reply in Another User's Conversation
You can reply in another team member's conversations, whether the customer was assigned to you or not. However, when you answer in another user's conversation, it'll let the client know that you're the one texting them. You won't receive notifications for a conversation that's not assigned to you, and the conversation will stay in the assigned user's list.
Assigning a Conversation
It's possible to reassign the conversation to a colleague or a team who's in a better position to service the customer. Simply follow these steps:

- Select the conversation you want to assign.
- (Optional) Click on Note, tag your colleague and write them a note letting them know why you are assigning this conversation to them.
- Select the drop-down menu at the top of your conversation.
- Select which user or team to assign the conversation to.
The conversation will disappear from your list, and your team member will be notified that a conversation has been assigned to them. The conversation will display the date and time of the reassignment, as well as your team member's name.
Assigning Multiple Conversations
- Select the checkbox on the left side of the customer's name in the conversation list.
- Select the multiple conversations by clicking on the boxes, one by one, and as many as you want. You can also click on the checkbox at the top of the conversation's list to select all conversations.
- Select the drop-down menu at the top of the conversation list.
- Select which user will be assigned the conversations.
The conversations will disappear from your list, and the user will be notified that conversations have been assigned to them. The conversation will display the date and time of the reassignment, as well as your team member's name.
Searching for a Customer's Data
Use the search bar in the upper section of your page to search for data on your customers. All you have to do is enter their name, appointment type, complete payment amount, RO number, phone number, or other identifying information.
Filtering Conversations
You can filter conversations by Open, Closed, or All. If a conversation was closed, you can always reopen it or search through your closed conversations to view them. This means that no conversation will ever be deleted from your account, and you will be able to keep track of every communication sent through Kimoby.
To filter conversations by open, closed, or all:
- Select the Conversations
 tab on the left side of your screen.
 - Select the filter icon next to the search bar at the top of your screen.
- Select Closed to display all closed conversations, Open to display all opened conversations, or All to display both closed and open conversations.
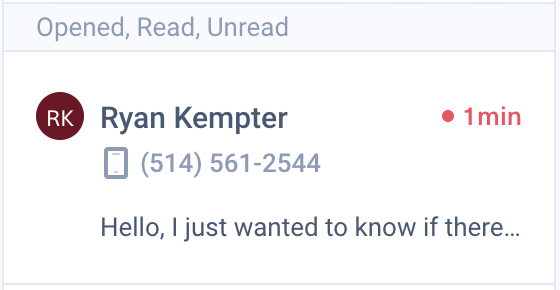
You can also filter conversations by Read, Unread, and Unanswered. You can select multiple of these filters at a time.
To filter conversations by read, unread, and unanswered:
- Select the Conversations tab on the left side of your screen.
- Select the funnel icon next to the search bar at the top of your screen.
- Select Read to display conversations that have been read, Unread to display conversations that have not been read yet, and Unanswered to display conversations where the customer has not been sent a response.
Closing Conversations Automatically
This feature is turned off by default, so you need to activate it in order for it to be applied to your account. Depending on your selected preference, conversations that are inactive after 1 to 15 days will be closed. You can choose to turn on/off this feature at any time.
- Select your profile icon at the top right corner of your screen.
- Select Company settings.
- Select Conversations
 in the sub-menu, on the left side of your screen.
 - Under Automatically close conversations after a predefined period of inactivity, choose whether you want Kimoby to close your conversation automatically or not.
- Select Update.
View the Message Source
Viewing the message source is a helpful way to track where messages are being sent from, like automations or campaigns. In a user's conversations, the source will appear directly underneath the message.
- Select the name of the source to be redirected to where the message was sent from.
- You can also see what time the message was sent or how many days ago the message was sent.
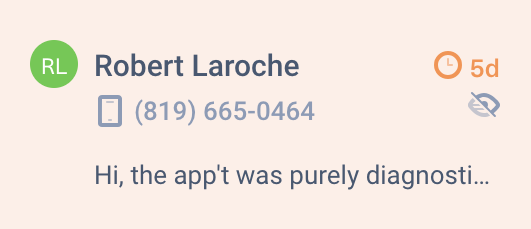
Viewing Unread Messages by Icon
If you are an account administrator, you'll see an eye icon to let you know if the user has seen the conversation assigned to them. The admin can use this feature to flag unread messages and improve team collaboration and efficiency. If the conversation is assigned to a team, the icon will only show if no staff member of that team has read the message.
If a message is assigned to you, a conversation that contains an unread message will be highlighted with a red dot.
If a message has been unanswered by a user after some time, the message will be highlighted in orange.
Notifications for Unanswered Conversations
If you are an account administrator, you can activate notifications for when user do not answer conversations in a set amount of time.
To do this, you can follow these steps:
- Click on your name at the top-right.
- Click Company Settings.
- From the list on the left, click Conversations.
- Scroll down until you see Notifications for unanswered conversations.
- Activate, deactivate, or modify the notifications as needed.
- Click Save changes when finished.
There are two different types of notifications:
- Notify users when they have unanswered conversations.
Checking this box will notify a user when a conversation assigned to them is open and has gone unanswered for a set period of time. This time interval can be set to your preference. -
Automatically assign unanswered conversations to another inbox.
Checking this box will reassign the conversation if it has not been answered by a user within the given time period. This can be used as an escalation tool in case a customer has gone unanswered for too long. The person the conversation gets assigned to, as well as the time interval, can be set to your preference.
Note
The time interval to assign the conversation to another inbox must be as long or longer than the time interval to notify the user that they have an unanswered conversation.
Conversations in Appointments
You can start a conversation with a customer directly in the Appointments interface.
- Select the Appointments
 tab on the left side of your screen.
 - Select a date. If appointments are booked on that date, you'll see a list of customers coming in for their appointment.
- Select your customer's name. You'll see their appointment details and have access to your customer's conversation.
- Write your message in the conversation box or insert a saved reply.
- Select Send.
Conversations in Automations

You can start a conversation with a customer directly in the Automations interface.
- Select the Automations
 tab on the left side of your screen.
 - Select an automation.
- Select View results on the top right side of your screen to see the customers that were reached with the automation.
- Select your customer's name. You'll see their information and conversation.
- Write your message in the conversation box or insert a saved reply.
- Select Send.
Conversations in Campaigns
You can start a conversation with a customer directly in the Campaigns interface.
- Select the Campaigns
 tab on the left side of your screen.
 - Select a campaign to see the complete list of customers reached by this campaign.
- Select your customer's name. You'll see their information and conversation.
- Write your message in the conversation box or insert a saved reply.
- Select Send.
Writing a Message to a Customer who no Longer has a Cell Phone Number
It's always possible that your customer no longer has a cell phone number. If this is the case, the message box will be blocked and you will not able to write a new message or answer an ongoing conversation. To help your team, you can leave an internal note in the customer's profile or conversation stating that they can no longer be reached by instant messaging.
Creating Teams in Conversations
Grouping staff into teams is an effective way to facilitate collaboration. You may want to create a specific team for Marketing, for example, or the Service department. All team members are able to see an access other teams' messages at all times so that everyone stays up-to-date with what is going on within the company.
To learn how to create a team, click here.
Exporting a conversation
You can export a conversation in a PDF format by clicking on the “Export” button at the top right of every conversation. This will create a box, prompting you to select all of the conversation or a specific date range for the conversation to be exported. The conversation excerpt will then be sent to you via a downloadable PDF in an email. Images, videos and other attached files will not be shown in the conversation, however the file name will be shared like a text message.
Archived Conversations for Merged Profiles
An “Archived conversation” can be found in a customer profile, under the Conversations tab. These are only created under special circumstances.
For example:
- Customer A is manually created in Kimoby with the cell phone number (555) 555-5555 and a conversation exists with this customer.
- Customer B is created by a DMS integration with the cell phone number (444) 444-4444 and a conversation exists with this customer.
If the cell phone number of Customer B is changed in the DMS integration to (555) 555-5555, Kimoby will merge both profiles together, since a cell phone number can only be present in a single profile.
When both profiles are merged, since only one conversation per customer can be active at a time, Customer A’s conversation will now become an “Archived conversation”.