It’s important to be able to keep track of your fleet. Knowing where your vehicles are and where they’re headed is vital to managing your loaner appointments. The Loaners section allows you to view and manage your dealership’s loaner vehicles, add new vehicles to the fleet, and track your vehicles’ locations on a live map. This section is divided into three tabs: Calendar, Overview, and Map.
Quick Links
Adding New Vehicles
To add a new vehicle in Kimoby Go:- Click on the Kimoby Go tab.
- If your vehicle is connected, follow these steps first. Otherwise, proceed to step 4:
- Click on the Settings sub-tab.
- Click on the Connectivity tab at the top of the page.
- Click Update on the connection you want to add the vehicle to.
- Enter the VIN of the vehicle.
- Under Destination Pool, select the vehicle pool you want the vehicle to be a part of.
- Click New car when finished.
- Click on the Loaners sub-tab.
- Click on New vehicle at the top-right of the page.
- Fill out the vehicle information. Here is what is required:
- Vehicle year
- Vehicle make
- Vehicle model
- Stock number
- License plate
- Choose whether or not to connect the vehicle.
- Vehicle VIN
- Choose which vehicle pool to add this vehicle to.
- When finished, click Create.
Calendar
The Calendar tab allows you to see which vehicles are currently loaned out, what date they plan on being returned, and check the availability of individual vehicles and vehicle pools, all in a clear and organized calendar format.
The calendar displays the current week by default. Click on the left and right arrows the navigate between weeks, or click on the Week drop-down menu to select a specific week.
The top part of the calendar page displays vehicle pools. Each column will show you how many vehicles in a vehicle pool are in use and how many are available that day.
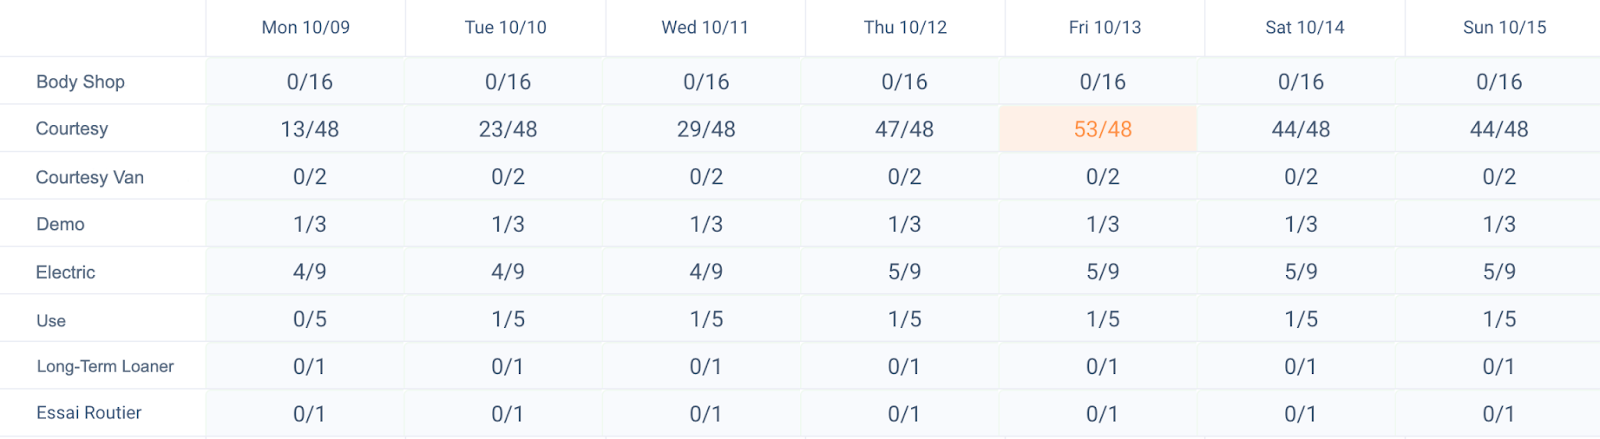
When a cell is highlighted in yellow, it signifies that all vehicles from this pool are booked for that day.
When a cell is highlighted in orange, it signifies that this vehicle pool has been overbooked for that day.
You can click on any of the cells in the calendar. This will open up a window with information on which vehicles are booked and what customer the booking is for.
The bottom part of the calendar displays all of the vehicles in your fleet. Here you can see the individual bookings for each vehicle throughout the week as well as which slots are free.

Clicking on a booking will open a window with more details about the booking, like the start date/time and planned return date/time. From this window, you can click on the three dots to perform certain actions:
- Detail
: This will show you all the details about the booking such as customer information, vehicle and vehicle pool information, and the rental agreement.
- Edit
: This allows you to edit the booking information.
- Delete
: This will delete the booking.
Overview
The Overview section displays a full list of all the vehicles in your fleet. Here you can find all the information you need about each vehicle. You can use the search bar to find a specific vehicle or filter by status and vehicle pool.
Here is the information available for each vehicle:
- Stock: The stock number of the vehicle.
- Vehicle: The colour, year, make, model, and license plate number of the vehicle
- Pool: The vehicle pool that the vehicle is in.
- VIN: The VIN of the vehicle.
- Sync: If a vehicle is synced, a green checkmark
will be present.
- Customer: The customer currently in possession of the vehicle.
- Expected Return: The date that the vehicle is expected to be back on the lot. A clock
icon means that there is no expected return date.
- Fuel: For connected vehicles, this will display the most recent data on the fuel level of the vehicle. For non-connected vehicles, this information will need to be entered manually.
- Mileage: For connected vehicles, this will display the most recent data on the mileage of the vehicle. For non-connected vehicles, this information will need to be entered manually.
- Location: Whether the vehicle is on the lot or off the lot. Note that only connected vehicles will display the correct location. If the vehicle is not connected, by default, it will always display “On Lot”.
- Status: The status of the vehicle. There are six statuses:
- Available: The vehicle is available for use and can be booked.
- Reserved: The vehicle has an upcoming booking.
- In Progress: The vehicle is in use by a customer.
- Overdue: The vehicle should be back on the lot but has not been returned yet.
- Inactive: The vehicle is not in service.
- Inspect: The vehicle is currently being inspected.
Clicking on any of the rows will open a window that displays more information about the vehicle’s bookings.
From this window, you can view or edit the following information:
- The vehicle’s status will display at the top of the window. Click on the switch button
to change the vehicle’s status to Inactive.
- Under the Bookings section, you can view what bookings are In Progress (current bookings), Future (upcoming bookings), and Past (previous bookings).
- Click on the New booking drop-down menu to create a new booking for that vehicle.
- Click on the Vehicle Pool drop-down menu to change the vehicle pool. Click Save when finished.
- Under Vehicle Details, you can view information about the vehicle. Click on Edit Vehicle Details to edit this information, and then click Save when finished.
- In the Notes section, you can add other pertinent details about the vehicle. Click on Update after adding a note.
Map
The map section provides the current location of your fleet vehicles. Vehicles appear as blue icons on the map. The location, as well as the mileage and fuel levels, are updated every minute while the vehicle is turned on.

Clicking on a particular vehicle will open a window with more details about the vehicle. This is the same details window as found in the Overview section, here.