The Repair orders feature is an internal communications tool for work orders and serves as a hub for customer files such as estimates, invoices, pictures, and videos. It's a tool you and your team can easily use to communicate with each other regarding specific work orders, get the latest repair and parts updates, or ask for pictures that will be relayed to customers.
The feature allows you to strengthen your internal processes. Repair order spaces are generated automatically from appointments and work orders in your DMS, so there’s no need for repetitive data entry. Every internal note related to a work order is captured in real-time and available for all to read in a single space. All the relevant files concerning a work order are also found quickly in the same place, preventing wasted time locating lost files for warranty claims or future reference.
The Repair orders feature helps facilitate work order management between you and your colleagues, saving you time and streamlining the communication process!
Quick Links
- Navigating Through Repair Orders
- Content Creation for Internal Communications
- Managing Your Repair Orders Space
- Filtering Repair Orders
- Creating a Repair Order Manually
Navigating Through Repair Orders
The Repair orders page is separated into two sections. Under My repair orders, you will find any repair order you own or have been added to, while under All repair orders, you will find all existing repair orders, including those you are not a part of.
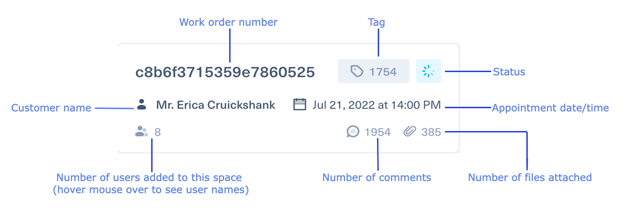
You can search for specific Repair order spaces by using the search bar and typing in the customer name, cell phone number, work order number, or tag number.
Each Repair order space has a status. The statuses are as follows:
- In Progress (For appointments happening that day or open work orders)
- Upcoming (For upcoming appointments in one day or more)
- Completed (When a work order is closed)
Statuses are updated automatically by your DMS but can also be manually changed by clicking on the customer’s Repair order space and selecting a new status from the drop-down menu.![]()
You can easily navigate to the conversation with the customer by clicking on View conversation from the top-right of any Repair order space. To switch back to the Repair order space, click on the Repair order box located on the right of the conversation.
If you want to view the customer’s information directly from the Repair order space, follow these steps:
- Click on the customer’s Repair order space.
- On the right-hand side of the space, click on the Information tab.
- From the drop-down menu, select Customer Information.
Content Creation for Internal Communications
To communicate with another colleague in the Repair Order space, type the "@" symbol to see a list of users and select the one(s) you want to communicate with. You can then type in the message you wish to transmit. The tagged participants will then be notified that a message has been sent to their attention.
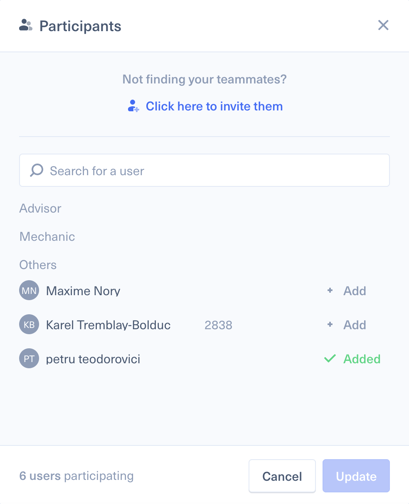
To add or remove another user to a Repair Order space:
- Click on the Repair Order space in question.
- Click on Participants.
- Search for the user(s) you want to add, and click on Add or Remove.
- When finished, click on Update.
Alternatively, you can simply mention the user in the text box using "@" symbol followed by their name. This will automatically add that user as a participant.
If the user you want to add is not listed, click on the Request an invite link at the top of the suggested participants' box and fill out the form. This will send your account administrators an invitation request by email. If you are an account administrator, you can simply click on the Invite user link to add a colleague.
To send pictures and videos to a customer, you can follow these steps:
- Click on the Join File button (paperclip icon) in the message box.
- Choose the file from your computer and add it to the space.
The file is now added to the space. It also appears in the Files section on the right-hand side of the space. From there:
- Click on the check box next to the file(s) you want to send.
- Click on Send at the top of the Files section.
You also have access to the Repair orders feature on our mobile app! From the mobile app, you can take pictures and videos and add them directly to the Repair Order space.
To take a picture or video from the Repair Order space:
- Open the Repair Order space in the mobile app.
- Tap on the camera icon at the bottom of the page.
- Choose Picture or Video.
- Tap on OK when finished.
- If you’ve taken a video, you can record another video to add to the space simultaneously by tapping on Join another. With multiple videos, you can choose Merge videos together and they will be added to the space as one file (videos will play back-to-back).
Note
Pictures and videos are never stored in your phone’s memory. All files are kept in Kimoby’s cloud storage.
To download a picture or video to your device, simply click on the file in the Repair Order space and click on Download, or on the ![]() icon on the mobile app.
icon on the mobile app.
Tip
Use the Repair Orders feature to internally report damage found on the vehicle. You can write detailed notes about the state of the vehicle directly within the repair order. You can also capture a video or image within the app to protect yourself from potential issues with the customer.
Managing your Repair Order space
You can be notified when a new message or file gets added to a Repair Order space. To manage your notifications:
- Click on your profile icon at the top-right of the screen.
- Click on Your Settings.
- Click on the Notifications tab.
- Scroll down to the Repair orders section and check the boxes you want to receive notifications in.
- When finished, click on Save changes.
When a Repair Order space has a message or file that has not been viewed by you yet, the Number of comments area will be highlighted in blue and have a blue dot next to it.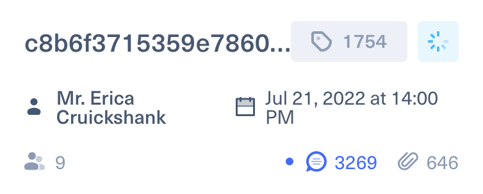
You can remove permission from a user to send a customer a message. This can be useful if, for example, you want a technician only to have access to Repair Order spaces but not to communicate with the customer.
To manage user permissions:
- Click on your profile icon at the top-right.
- Click on Company Settings.
- Click on the Users tab.
- Click on the Edit button (pencil icon) next to the user you want to modify.
- Add or remove permissions with the checkboxes.
- Click on Save changes.
Using Metrics, you can also view statistics about the Repair orders feature usage. To view these statistics:
- Click on the Metrics tab on the left side of the app.
- Scroll down to the Users section.
- The columns Internal Videos and Internal Pictures are related to the Repair orders feature. These numbers show how many pictures and videos a user sent through a Repair Order space.
Note
Like other sections in Metrics, you can click on the ![]() button to export these statistics to a Microsoft Excel file.
button to export these statistics to a Microsoft Excel file.
Filtering Repair Orders
There are a few different ways you can filter your Repair Orders so that you can more easily find what you’re looking for.
Common Filters
The three most commonly used filters are located at the top of the page:
- Upcoming Today
- Ongoing Today
- Closed Today
For each of these filters, you can further filter the Repair Orders by selecting this icon ![]() to choose whether you want to see all of those Repair Orders or only the ones assigned to you.
to choose whether you want to see all of those Repair Orders or only the ones assigned to you.
Date Range
You can filter the Repair Orders by date by clicking the calendar icon. Select a starting and ending date to set the range, or select a pre-determined period of time from the list on the right. Click Apply to apply to filter.
You can also select Today, next to the date range, which will show you only Repair Orders that were opened today.
Filter Icon
The Filter button allows you to filter in a variety of different ways:
Status
These options allow you to filter based on the statuses of the Repair Orders.
- Upcoming
- Ongoing
- Closed
Actions
These options allow you to filter based on actions taken inside of the Repair Orders.
- With videos taken
- With videos sent (to the customer)
- With images taken
- With images sent (to the customer)
- With estimates sent (to the customer)
- With payment requests sent (to the customer)
Appointment Status
These options allow you to filter Repair Orders based on the status of the connected appointment.
- Confirmed
- Canceled
- Unconfirmed
- Rescheduled
- No appointment
Participants
A participant is a user that was added to a Repair Order, either manually, or automatically if they were assigned to the repair order as it was opened. You can filter Repair Orders by participants.
Click on the Participants drop-down menu and select any number of users you for whcih want to see Repair Orders.
You can also select Me, next to Participants, which will show you only Repair Orders of which you are a participant.
Creating a Repair Order Manually
This feature allows users with an active integration to create Repair Orders directly in Kimoby when needed. This is especially useful if there is a temporary interruption with the integration and Repair Orders are not being received automatically.
To create an RO manually:
- Click the Repair Orders tab.
- Click Create RO at the top-right.
- Enter the Repair Order Number.
- Search for the customer that the RO is for (by name or phone number).
- Click Create RO.