Creating Customer Groups is an important step in ensuring your communications are relevant and targeted. Remember, the more customized the messaging, the more traction you will get from your Instant Marketing Campaigns and Automations. To reach the right person with the right messaging, you need to invest a little bit of time in creating Customer Groups that make sense for your business.
Once you create a Customer Group, it will be continuously updated through the data that Kimoby retrieves. Customers who match your set of rules for a group will get added to the cohort.
Quick Links
- Example of Customer Groups
- Creating a Customer Group
- Adding Customers to Groups
- Understanding Why Customers Get Added to Groups
Example of Customer Groups
Here are just some ways you may want to group your customers together.
- Car/home insurance renewal date in January/February/etc.
- Cat/dog/etc. owners
- Customers from a specific region/town
- Customer who bought a new vehicle in the last year
- Customer who filed an insurance claim in the last 3 months
- Customer with a rental car
- Customer with car and home insurance
- Customers who don't want to be contacted by campaigns
- Customers who made a return/exchange
- Customer with a 2019/2020/etc. vehicle
- VIP customers
- Etc.
Creating a Customer Group
- Select the Campaigns
.png?width=16&height=16&name=Sleep%20(1).png) tab on the left side of your screen.
tab on the left side of your screen. - Select the Groups
 sub-tab.
 - Select New group.
- Name your group.
- Select Create.
Adding Customers to Groups
With Rules and Condition Filters

- Select the Campaigns tab on the left side of your screen.
- Select the Groups sub-tab.
- Select the group of your choice.
- Select Edit rules.
To target customers in a group, you'll need to choose different rules.
Category
You can select each of the following four categories that will be based upon the information that you have in your Kimoby database:
- Appointment
- Customer
- Message received
- Message sent
Depending on your integration and your type of business, you'll be able to select different categories based on events to build your automation or group.
Attributes
The attributes pinpoint what your category will be related to. In other words, it is whatever data you are trying to pull to create your list of customers targeted by your automation or group.
- Date
- Name
- Phone number
- Etc.
For the appointment and customer categories under attributes, you'll be able to select the custom attributes for your account.
Operator
This applies logic rules to determine and select what you want (similar to the logic rules you would use in a spreadsheet program).
- Contains/does not contain
- Is/is. not/is unknown
- Etc.
Value
This is where you enter the exact value that you would like Kimoby to match your customers with.
Rules/Sub-Rules
A rule is the exact criteria customers need to satisfy to be targeted by your automation or group. A sub-rule is complementary to the fixed rule that was set up.
If you have a group with four rules, customers will need to match all four rules to be targeted. However, if you have a group with one rule and three sub-rules, customers will need to match any one of those sub-rules to be targeted.
Set up as many rules as you want for your customer group.
Example of a Group Creation With Rules and Condition Filters
Let's say you want to create a group with customers who own an Escape vehicle model.
First of all, you want your group to include customers that had their last repair closed less than 2 years ago to keep respecting CASL.
- Select Edit rules above the name of your group, on the left of your screen.
- Set up the first rule for your group.
- Category: Repair order closed
- Attribute: Last time
- Operator: Less than
- Value: 30 days ago. Here, put in 30 days ago only for Kimoby to search through the last month's repair orders. If you are putting rules that include too many customers, Kimoby will take a long time to execute your request and it may never be processed. When all your rules to target the right group of customers will be set, then we will change the 30-day range.
- Select Add new rule.
- Set up the second rule for your group.
- Category: Customer
- Attribute: Vehicle model
- Operator: Contains
- Value: Escape
- When all the rules to target the right group of customers are set, you can change the value 30 days ago from your first rule to 730 days or the range of days you wish to attain
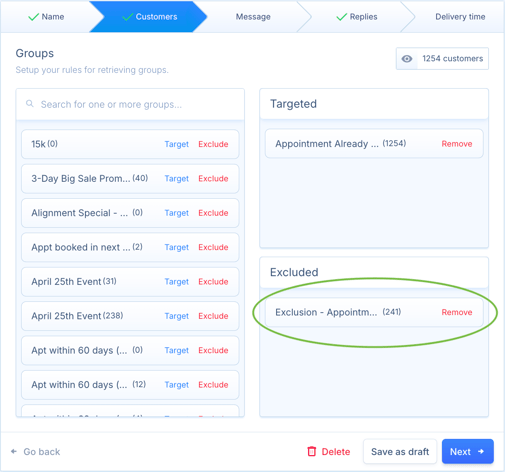
Exclusion Groups
Using rules, you can create groups specifically to exclude certain customers from campaigns and automations.
To create an exclusion group, you will need to target the type of customer you are looking to exclude:
- Click the Campaigns tab.
- Click the Groups sub-tab.
- Click New group.
- Name your group. (Tip: Include “Exclusion” in the title to identify it more easily)
- Click Create.
- Click the Edit rules button on the left of the screen.
- Use the rules to target the customers you want to exclude. For example, if you want to exclude customers who have an appointment in the next 30 days, use the rule “Appointment - next one - in less than - 30 days”.
- Click Save changes.
- When creating a campaign or automation, search for the group in the Customers section and click Exclude.
With an Import
Please make sure your Excel sheet is clean before starting your import. This means no empty or extra rows and columns, one value per cell, and no main titles at the top of your spreadsheet, except your column titles.
Save your Excel sheet as a .csv for the best results.
.gif?width=670&height=362&name=Untitled%20design%20(3).gif)
- Select the Campaigns tab on the left side of your screen.
- Select the Groups sub-tab.
- Select the group of your choice.
- Select Import
-1.png) .
. - Drag and drop your Excel sheet in the Import customers box or click on browse your files.
- Wait until the import is complete.
- Select Create import.
Creating Your Import
Note
If the first row of your Excel sheet contains the main titles of your columns, select the checkbox First row is the column's header located on the upper section of your screen.
Kimoby will then use this information as titles and not as customer information.
As soon as you create your import, you will be redirected to your import's page. You will need to identify and match your Excel file's information with Kimoby attributes for each column.
- Select Belongs to drop-down manu on the right of each column.
- Choose the category for each column.
- Add a category by clicking on New string if the title of your column is not in the drop-down menu.
- Write the attribute's name in the box right under New string.
- You can skip a column in the drop-down menu by selecting Skip this column. Kimoby will then discard that information from your group.
- Select Import.
Manually
If you would like to add customers to an existing group whether they match the rules or not, you can add them manually. Once added, they will stay in the group even if they don't match the rules. Adding customers manually can save you time when you want to add a few customers to the group without having to redo all of the rules.
- Select the Campaigns tab on the left side of your screen.
- Select the Groups sub-tab.
- Select the group of your choice.
- Select Add customers
-1.png) .
. - Type in the name or mobile phone number of the customer you wish to add to your group.
- Select the customer's name, and they will be added to your group.
Understanding Why Customers Get Added to Groups
Customers can end up in groups through three different channels. Either they were added manually, they were part of an imported spreadsheet, or they matched the rules of the group.
When you go to the Groups ![]() section, you can see why a customer was added to a group. In the Origin column, you will find different icons for Added Manually
section, you can see why a customer was added to a group. In the Origin column, you will find different icons for Added Manually ![]() , Imported
, Imported ![]() , or Matched Rules
, or Matched Rules ![]() . They will be highlighted if they are the reason the customer was added to the group.
. They will be highlighted if they are the reason the customer was added to the group.